Implementing new software can be challenging, especially for critical tasks like mergers, due diligence, or audits. In particular, companies face complex setups, steep learning curves, and data security concerns.
Fortunately, a virtual data room, also known as an investor data room, is easy to set up and use. Unlike other solutions, this platform combines simplicity with advanced security features, ensuring smooth onboarding, efficient workflows, and reliable data protection.
Read our post to learn why companies use virtual data rooms, how the solution works, and how to set it up easily!
Before we start: What are the most common data room use cases?
Typically, companies use the software to store, share, and collaborate on sensitive data securely and effectively in the following cases:
M&A. Mergers and acquisitions are complex financial transactions requiring thorough documentation preparation and review. Virtual data rooms provide a protected online platform to store and manage financial records so that sell- and buy-side parties have quick and secure data access.
Due diligence process. The platform offers the sell-side a secure space to store relevant documents for review while providing prospective investors with a centralized, user-friendly hub to access and analyze those files. Moreover, virtual data rooms enable seamless collaboration between parties, accelerating deal completion.
Initial public offering. Taking a private company public involves extensive paperwork, strict adherence to local and federal regulations, and maintaining transparency for the public and prospective shareholders. Data rooms simplify this by securely organizing, managing, and allowing users to share critical documents while ensuring compliance.
Fundraising. Raising funds is one of the key ways for businesses to grow. However, attracting investors requires gathering lots of documentation and establishing cooperation between leadership teams. A data room for investors streamlines data collection, document review, and collaboration in one secure space.
Audits. Organizations often need to share sensitive data with external parties for audits, such as when seeking certification, compliance, or meeting legal requirements. In these cases, virtual data rooms provide a highly protected space for keeping and sharing sensitive information in a secure environment.
Other data room use cases include strategic partnerships, corporate development, and secure document sharing.
How do virtual data rooms work?
Here is a quick outline of data room functionality to help you understand how it protects data, simplifies collaboration, and ensures accountability.
Feature
How it works
Compliance
Online data rooms comply with global regulations, including ISO/IEC 27001, SOC 2/3, GDPR, and HIPAA, ensuring top-tier protection.
Multi-layered data encryption
The encryption system utilizes TLS protocols for transfer and AES 256-bit encryption for storage.
Two-factor authentication
Data room authentication requires a password and a one-time code sent to the user’s device.
Data room index
Auto indexing automatically organizes files and keeps them easily accessible and searchable, even if you add or remove files.
Granular user permissions
The permission settings allow administrators to define specific data room access levels for each user.
Time and IP restrictions
Data room administrators can control when and where users can access sensitive data.
Q&A
Dedicated Q&A spaces allow users to exchange questions and answers in an easy-to-navigate hub.
Multi-project management
Teams can effectively manage multiple projects, track progress, and collaborate seamlessly, regardless of the amount of data and number of parties involved.
Now that you know what companies use the software for and how it works for protecting sensitive documents and simplifying workflows, explore how to organize well-structured data room spaces.
Setting up a data room: Step-by-step instruction
An ideal data room is the one which ensures robust security features, effortless document organization, and smooth collaboration. How to achieve this? Follow the steps below to set up your data room in the best way:
Step 1: Choose a virtual data room provider
When you’re looking to acquire a product that will get used every day — and by many people, too — you want to make sure you get the right fit for your needs.
Time to do your homework.
First of all, understand what you need: most data room providers share a number of core functions, but there can be important differences across providers or usage plans.
Ask yourself:
How much storage do I need?
How many people will be using the data room software?
What’s my budget?
How long will I be using the data room?
Does my business vertical require any specific functions?
Having your priorities in place can streamline your search, saving you time and effort when deciding on the right virtual data room provider.
Here are a few things to look out for when choosing the most effective data room for your deal:
Security: As this is likely an important feature for you, you want a VDR that puts a premium on security. Look for data and access protection features such as advanced encryption, digital rights management functions, 2-step verification, and compliance with security standards. This will ensure your financial statements, legal documents, intellectual property licenses, and other sensitive data is protected.
Usability: As a rule of thumb, simple is good. An intuitive interface where everything is easy to find will help you and your team adapt faster to the new environment, besides increasing your effectiveness in the long run.
User base: Some small businesses target specific providers; if instead, you need compatibility for a large number of users, look for providers that offer enterprise-grade solutions.
Cost: If this is one of your important criteria for finding a good VDR, be sure to look for competitive VDR pricing. Keep in mind that if you feel that your preferred provider is overpriced or outside of your budget, try negotiating.
Other features: this includes anything else that matches your company’s specific needs for document storage.
By now, you should have a few (hopefully, at least a few) finalists. Now, it’s time to get a second opinion; head over to review aggregator websites to find out how providers compare to one another.
Most data room provider websites have their own review and testimonial section, but ideally, you want to look at what external sources have to say. Also, check review aggregators and forums — but keep clear of “top ten”-style articles, as those are typically commissioned by a provider itself and not necessarily reliable.
Quick tip: When you think reviews, think numbers. Better a 4.5/5 out of 1000 reviews than a 5/5 out of 50.
Provider
Ideals
DealRoom
Merrill Datasite
Pricing type
Custom Monthly subscription
Flat rate Monthly subscription
Custom Monthly subscription
Packages offered
Pro Business Enterprise
Sell-Side Pipeline Execution Suite
Single package
Hidden fees
No
No
N/A
Unlimited users
Yes
Yes
Yes
Free trial
30 days
14 days
No
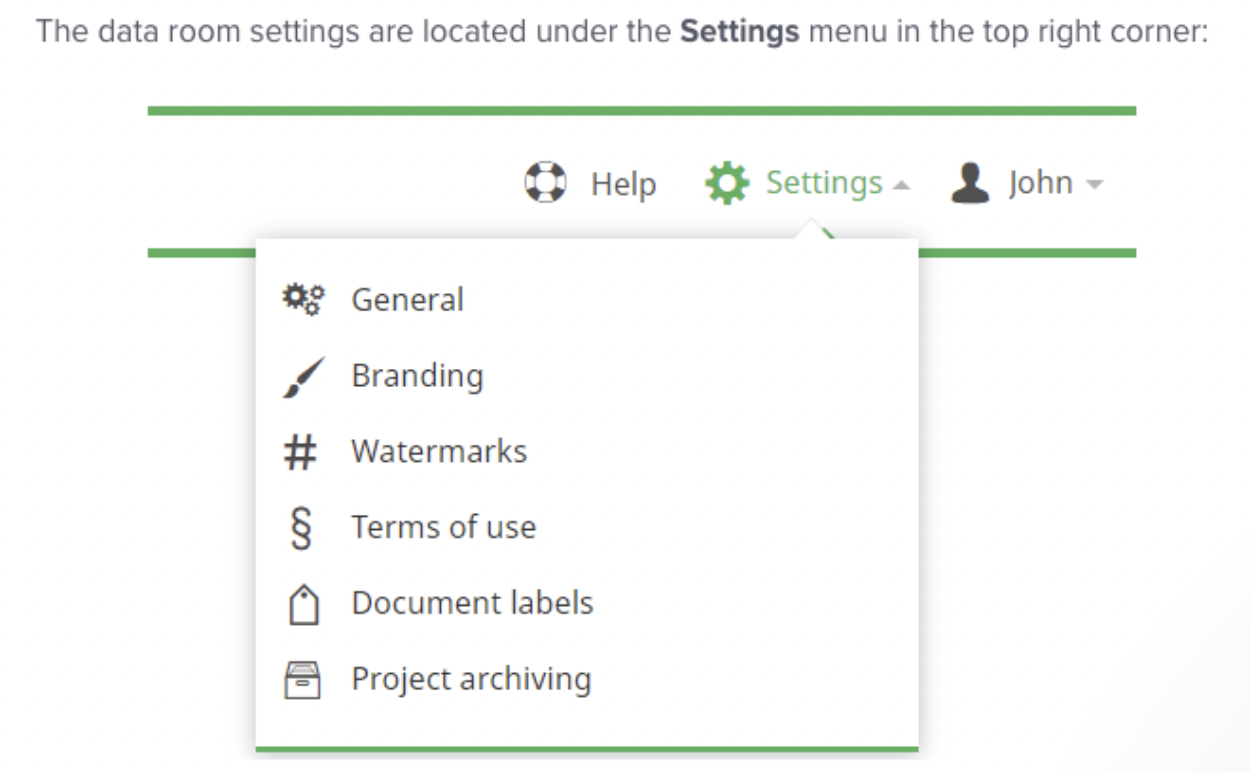
Step 2: Configure data room settings
First, assign a project name, ideally using a random name generator for added security during M&A transactions. Next, disclose the contact information of project administrators to ensure that future VDR users can easily reach out with project-related inquiries. Finally, implement a non-disclosure agreement within a data room to safeguard against data breaches and intellectual property theft, ensuring all stakeholders sign this agreement.
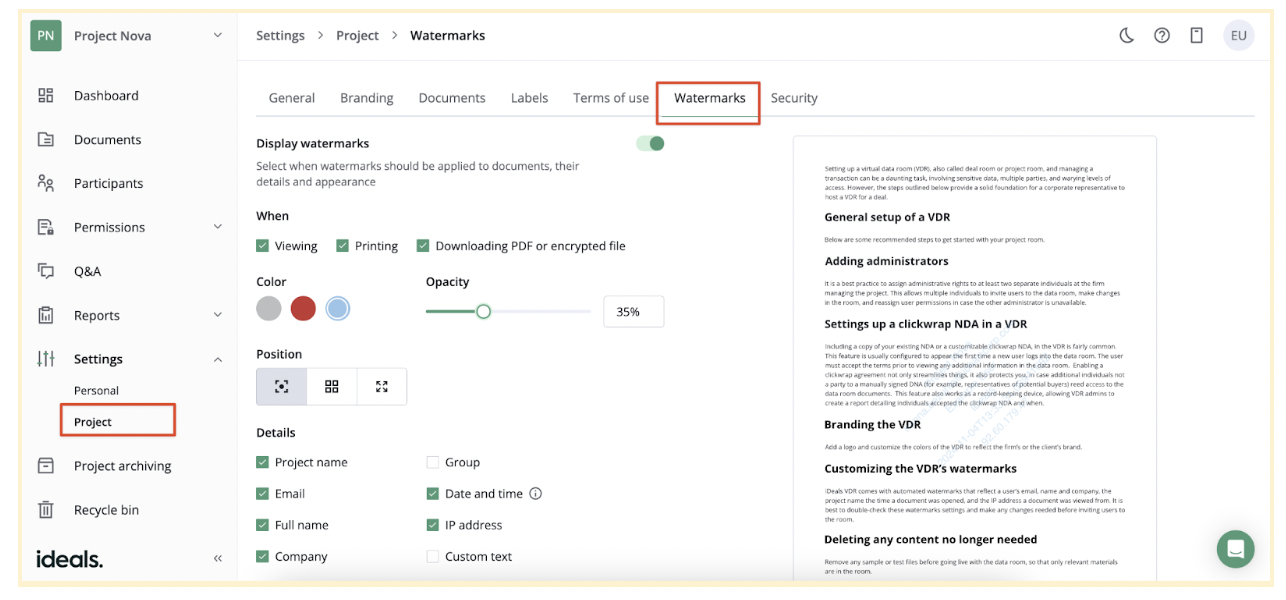
Step 3: Configure watermarks
A watermark is an image or text, such as a user name, date, or IP address, that appears behind the main content of sensitive files. You should watermark your documents to ensure the following:
Security. These markers signal that the document contains confidential information and should not be shared without authorization.
Traceability. Watermarks help identify the source of leaks.
Compliance. Some regulatory frameworks mandate watermarks to meet data protection standards.
To strengthen security, data room providers strongly recommend applying watermarks to all documents, especially if you prepare virtual data room for an M&A due diligence process.
Step 4: Set up a data room structure
Modern virtual data rooms offer numerous document management features that make uploading and organizing files quick. Here is how you can add files and folders:
Drag and drop files. Drag selected files into the platform for easy upload.
Upload documents in bulk. Upload multiple files simultaneously with no restrictions on size or quantity.
Use auto-indexing. Choose how to organize files and folders using sequential or numerical-alphabetical indexing.
Label files. Categorize files by status, access level, or department for streamlined organization.
Rename files. Edit document names in a data room to make them more descriptive.
Upload files in all formats. Upload files in any format and have them converted into secure, easily accessible PDFs.
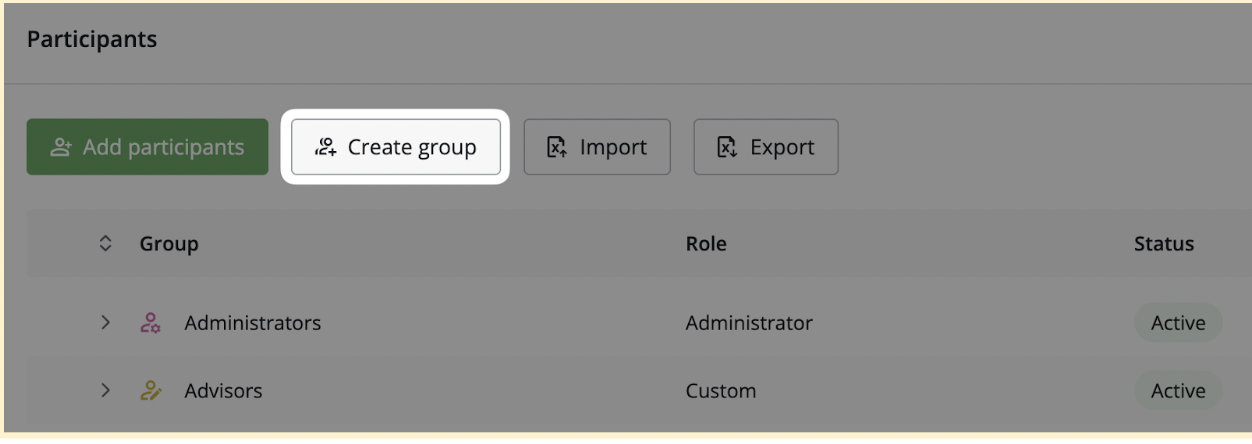
Step 5: Create groups and invite users
Virtual data rooms typically include an intuitive user management page where you can organize and control access. First, create groups and assign each a name and optional description. Then, add users individually or invite large numbers in bulk.
There are two main user roles in a data room:
Administrators. These users manage the data room, including granting or revoking document access, setting permissions, hiding members from each other, creating file structures, viewing activity reports, and overseeing overall operations.
Users. Depending on assigned permissions, users can view and search for documents, leave comments, collaborate with group members, and, if permitted, edit, print, or download files.
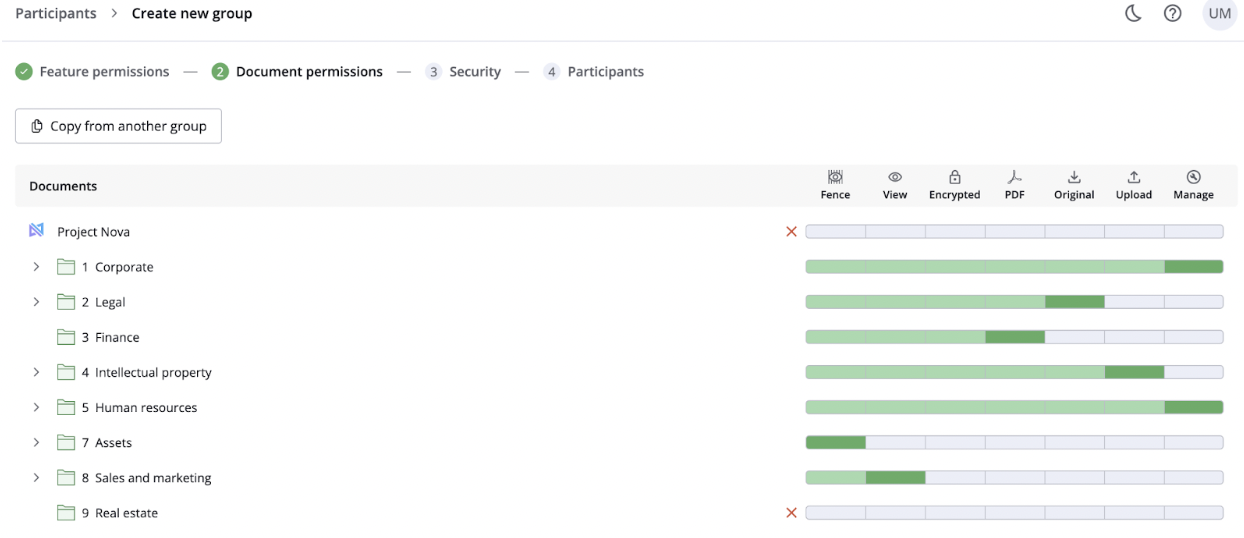
Step 6: Set permissions
Define user access levels at the folder, document, or group level. Here are the most common permission types:
None. A user has no access to specific data room files, but an administrator can allow access to other data room documents.
Fence view. Sensitive documents are displayed with a virtual “fence,” revealing only specific sections while concealing the rest to reduce the risk of unauthorized access. So, users can view some parts of the document by moving a cursor without access to the full content.
View. A user can view documents without printing or downloading them.
Download the encrypted file. A user can download a protected version of the document, often requiring a code to open it.
Print. A user can print documents and download encrypted files.
Download PDF. A user can download watermarked PDF versions of documents, with download events tracked by administrators.
Download original. A user can download documents in their original formats.
Upload. A user can upload files, but this action may be restricted to specific folders.
Step 7: Confirm data room software settings
Ensure your data room is secure and fully operational by reviewing the following:
Administrator settings. Verify that an administrator can access and control all data room settings. Double-check that all configurations are accurate and functional.
User access. Use the “view as” feature to test user access. Confirm that users can only see the documents and folders according to their permissions.
Security features. Check critical security measures like two-factor authentication, encryption protocols, and watermarking to ensure strong data protection.
Audit trail. Confirm that the audit trail tool is enabled and tracks all sensitive information, such as user activity and document access timestamps, for transparency and accountability.
What challenges might a new user face when setting up a data room?
Creating a comprehensive data room can be challenging for new users due to complex configurations and security requirements. Fortunately, some providers offer dedicated project managers and support to assist teams. Also, our expert tips can help you manage the process.
Challenge
Solution
Setup complexity
Follow the guided setup wizard that helps you import data in bulk, set up folder structures, and configure security settings. Pre-configured templates for specific projects like due diligence can help streamline the process.
Security concerns
Ensure that high-security configurations like two-factor authentication, encryption, and secure document sharing are enabled by default. Customize document expiration, watermarks, and access restrictions based on IP address or time. Regularly audit security settings.
Document organization
Before uploading documents, create a clear folder structure to categorize and label files logically. Use subfolders to break down complex projects for easy navigation. It ensures that both administrators and users can find documents quickly.
User access management
Create user groups based on roles and assign access permissions accordingly. Granular role-based controls ensure each user has the appropriate level of access. Review permissions to keep them up to date.
Testing access and functionality
Use “view as” or “preview” tools to test user access levels and ensure permissions are correct. Simulate real-world scenarios, like accessing the data room from different devices, to ensure everything works as expected. Moreover, audit trails can help you track changes or access in real-time.
Conclusion
As you see, setting up a well-prepared data room is not brain surgery.
If you choose a good data room provider and follow the above steps with a clear organizational principle in mind, you’ll soon find yourself operating in a secure and superbly efficient environment. And as for the bit of time it takes to set up the data room?
More than worth it.
Author
Editorial Team of dataroom-providers.org
Data room selection & optimization expert with 10+ years of helping companies collaborate more securely on sensitive documents.
We use cookies on our website to ensure the best user experience. By clicking "Agree" you are letting us use cookies according to our cookie policy. Learn more